Whether you run a club, church, professional association, chamber of commerce, or any other type of membership organization, your goal is likely the same — to retain your members and keep them happy and engaged.
One thing that can help with this is giving out certificates to your members. These can be awarded for special achievements, winning a contest, completing a course, or volunteering. You can even give out membership certificates for simply being a member (or staying a member for a long time).
Whatever the cause, having a few certificate templates on hand is a fun and simple way to engage your members and thank them for being a part of your community.
In this post, we’ll take a look at how to create your own certificate templates, as well as share a free template you can download and use right away.
Let’s dive in!
Why Are Certificates Important?
Issuing certificates to your members allows you to:
- Recognize them for their participation, accomplishments, and long-standing membership
- Show your appreciation for their continued support or any special acts of kindness
- Welcome new members and give them something they can display to show off their membership
- Improve member engagement and participation
- Increase member retention rates
- Build a sense of community among existing members and attract new members who want to be a part of something special
Read More: Membership Certificate Templates (FREE!)
How Do I Create a Certificate Template?
When it comes to creating certificates for your members, you have a few options:
Microsoft Word
This is the easiest and most accessible option — Word is a widely used software and you likely already know how to use it. Its design features can be a little finicky to use, but it has tons of great templates you can use as a starting place. It’s also easy to personalize each certificate or even use the mail merge function to customize a whole batch of them in a matter of seconds.
Google Docs
If you don’t have access to Microsoft Word, Google Docs is a free alternative. It’s very similar to Word, but it doesn’t have mail merge capabilities, so you’ll need to customize each certificate individually. If you have a ready-made template, you can just add it to the Google Doc and edit the text.
Canva
Canva is a design tool perfect for people who don’t have any experience with graphic design. It’s easy to use and very intuitive. You can use their pre-made templates or design your own. You can also customize each certificate within Canva or download your template as an editable PDF.
Adobe InDesign and/or Acrobat Reader
If you’ve done design work before, you may be familiar with the Adobe Creative Cloud tools. They’re the industry standard for graphic design and they make it easy to create, edit, and customize certificates. That being said, if you don’t already have an Adobe subscription that you use for other projects, getting it just for this may not be worth it.
What Information Should Be Included?
Your certificates don’t have to be complicated. Here’s what to include:
- Your organization’s name and logo
- Member’s name
- Member ID (if applicable)
- What the certificate is for
- Date issued
- Expiration date (if applicable)
How To Create a Certificate in Microsoft Word
Microsoft Word offers beautiful certificate templates you can load and use in a matter of seconds. Simply open up a new document and search “certificate” in the search bar. You can then customize them with your organization’s and your members’ details.

If instead of using a template, you’d like to create something brand new from scratch, follow the instructions below:
Step 1
Most certificates have a landscape orientation, so you’ll need to set up your document this way. In the Layout tab, click Orientation and select Landscape. If you’d like your certificate to remain in portrait, you can skip this step.

Step 2
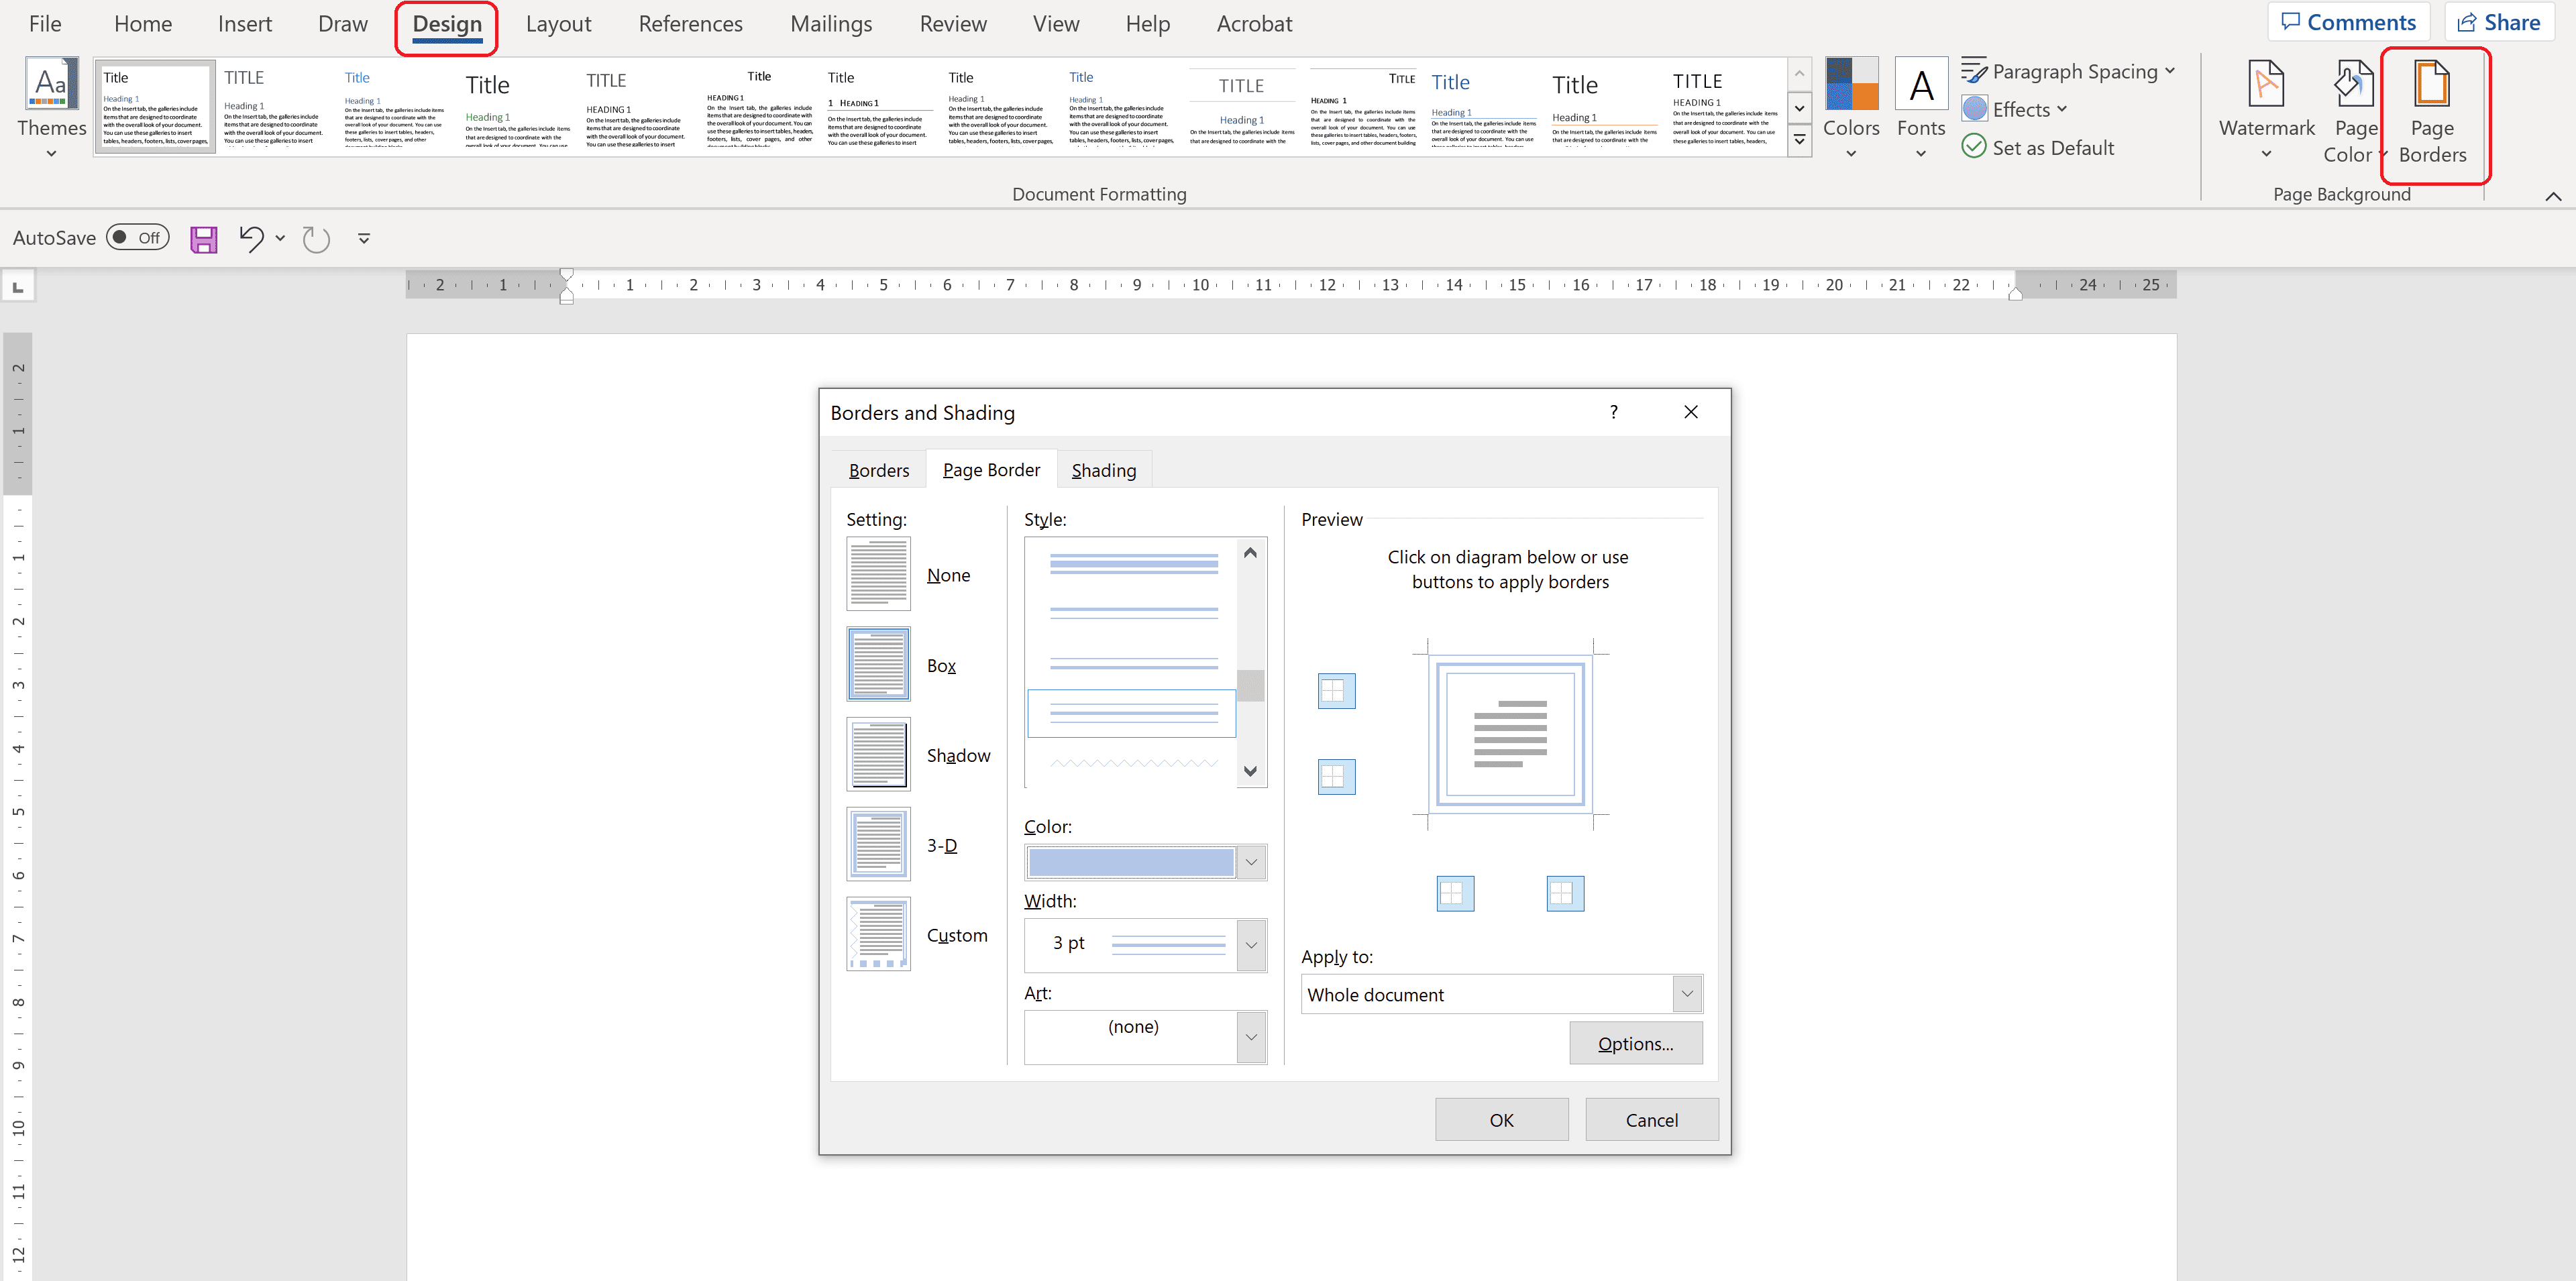
If you want your certificate to have a border, select the Design tab and then click on Page Borders. A window will pop up where you’ll be able to select the style, thickness, and color of your border. Click OK to insert it.
Step 3
Next, you’ll need to add some text. In the Insert tab, click on Text Box. Add as many text boxes as you need to make sure your certificate includes all the relevant information.
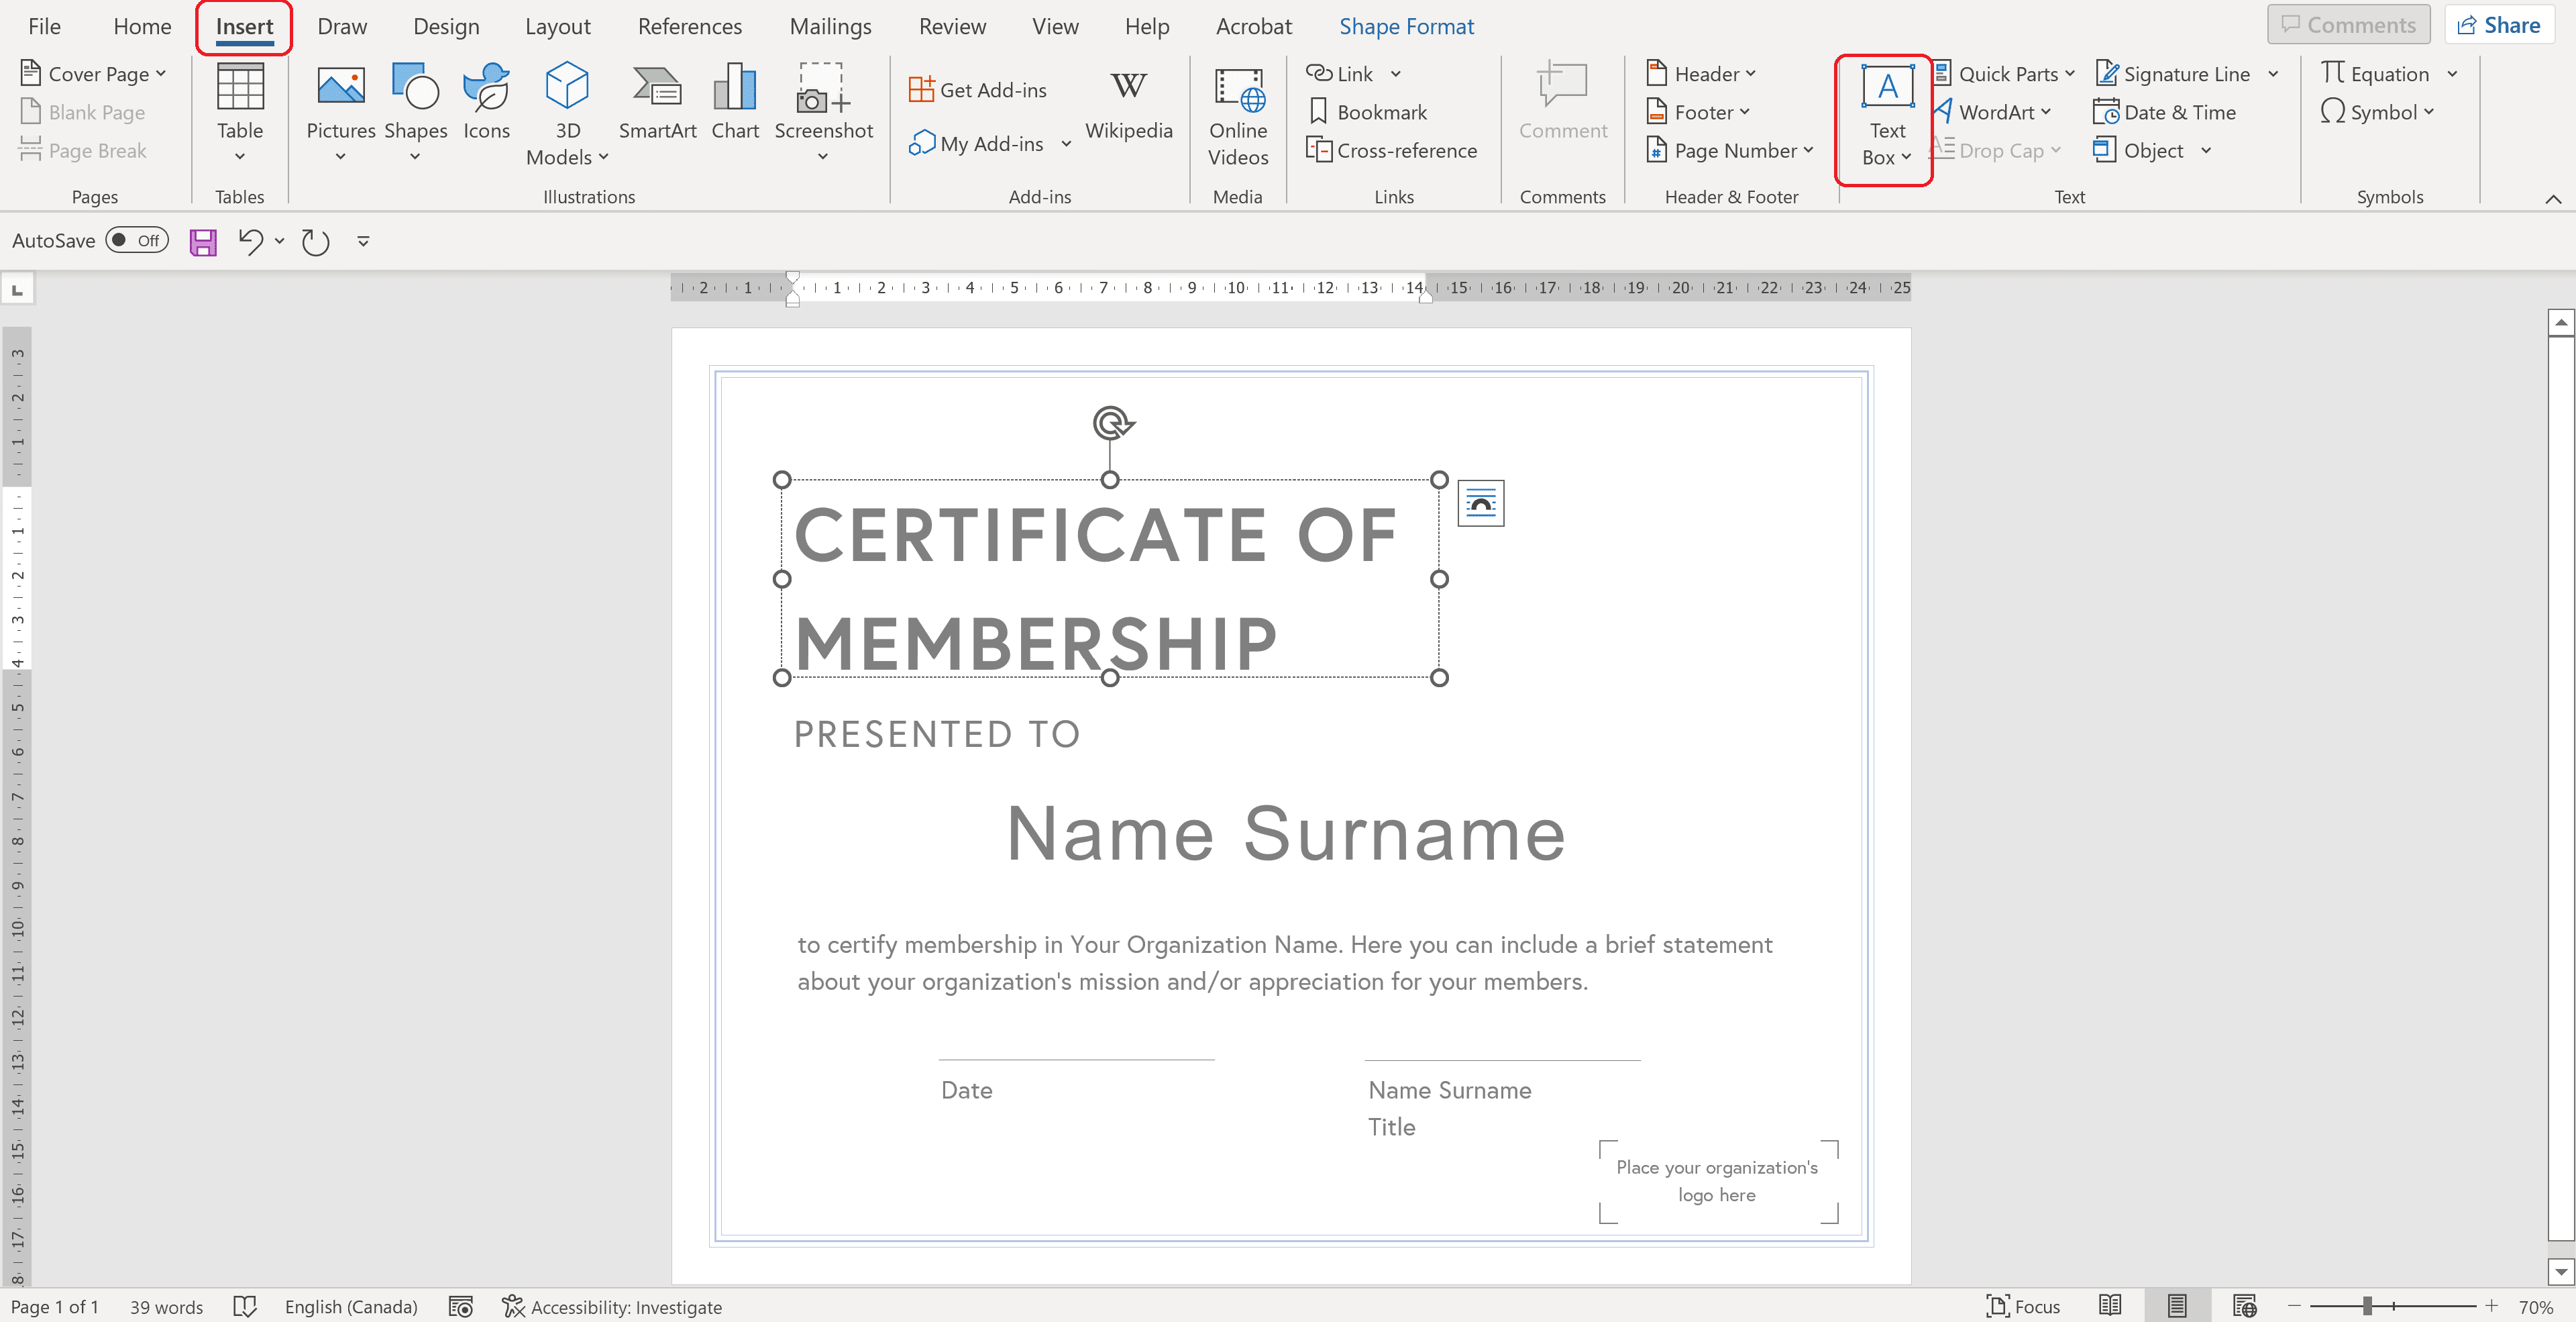
Back in the Home tab you can edit the font, size, and color of each block of text.

Step 4
If you’d like to include your organization’s logo on your certificate, you can add it from the Insert tab by clicking on Pictures.

At this point, your certificate is ready to use. You can edit it every time you’d like to print a new one for a particular member. However, if you have a batch of certificates to print, we recommend doing a mail merge. Here’s how:
Step 5
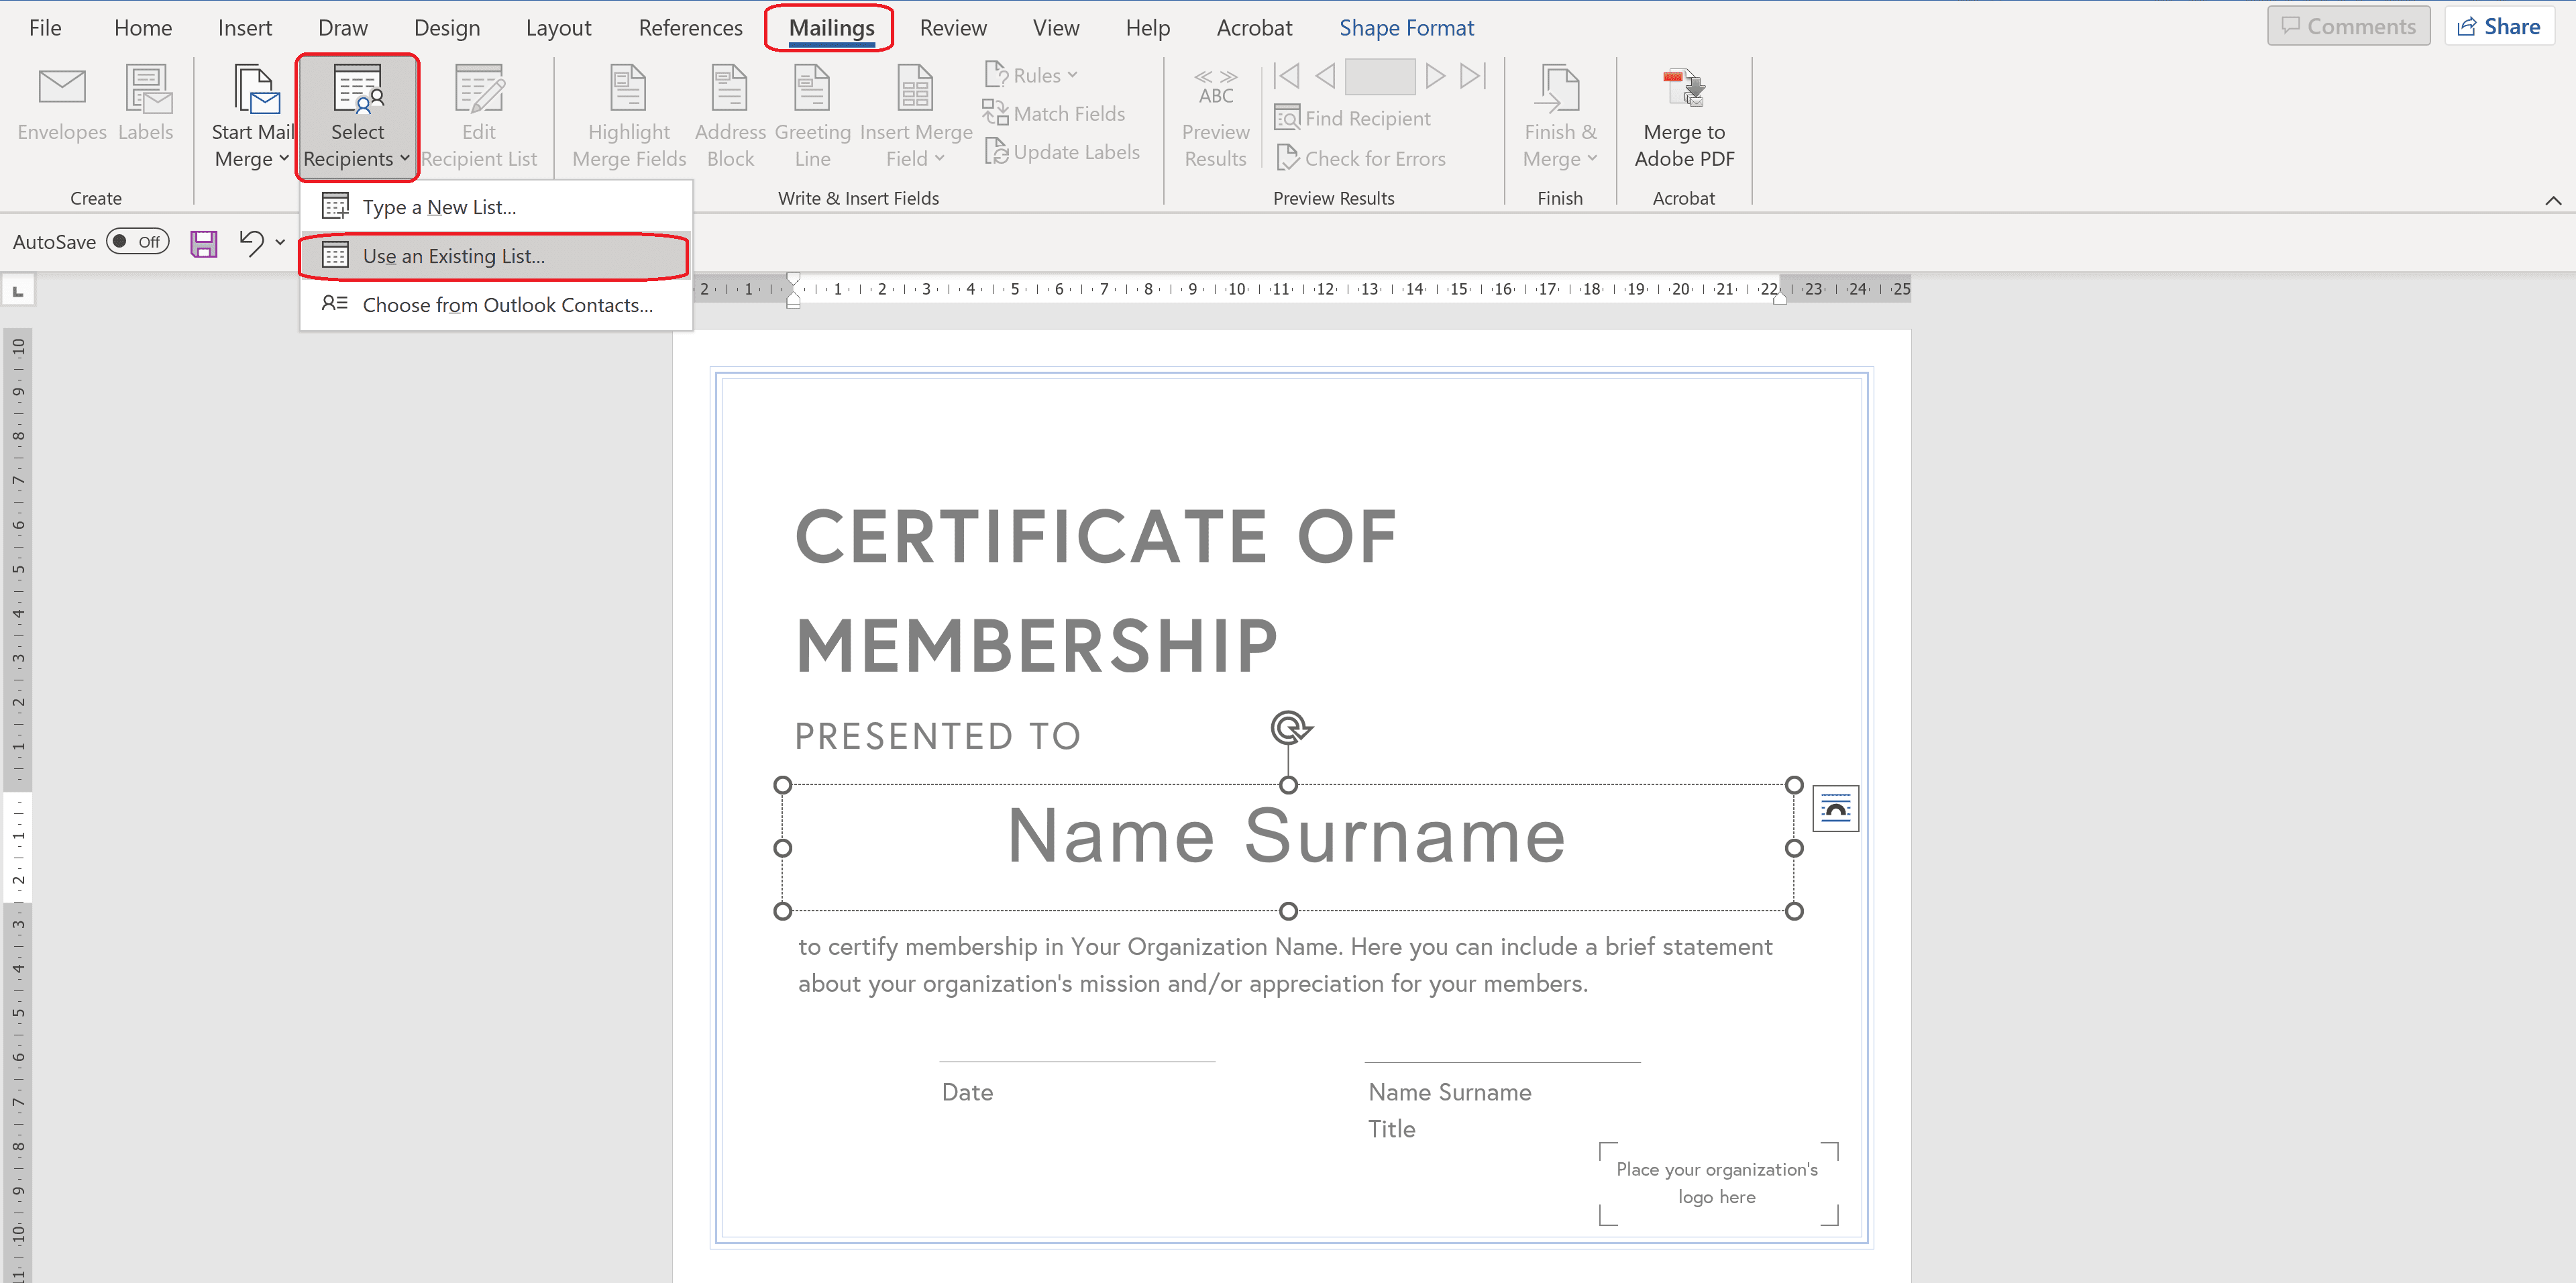
Prepare an Excel spreadsheet with your members’ names and other details you’d like to include on the certificates. From the Mailings tab, click on Select Recipients and then Use an Existing List to link your spreadsheet to the Word document.
Step 6
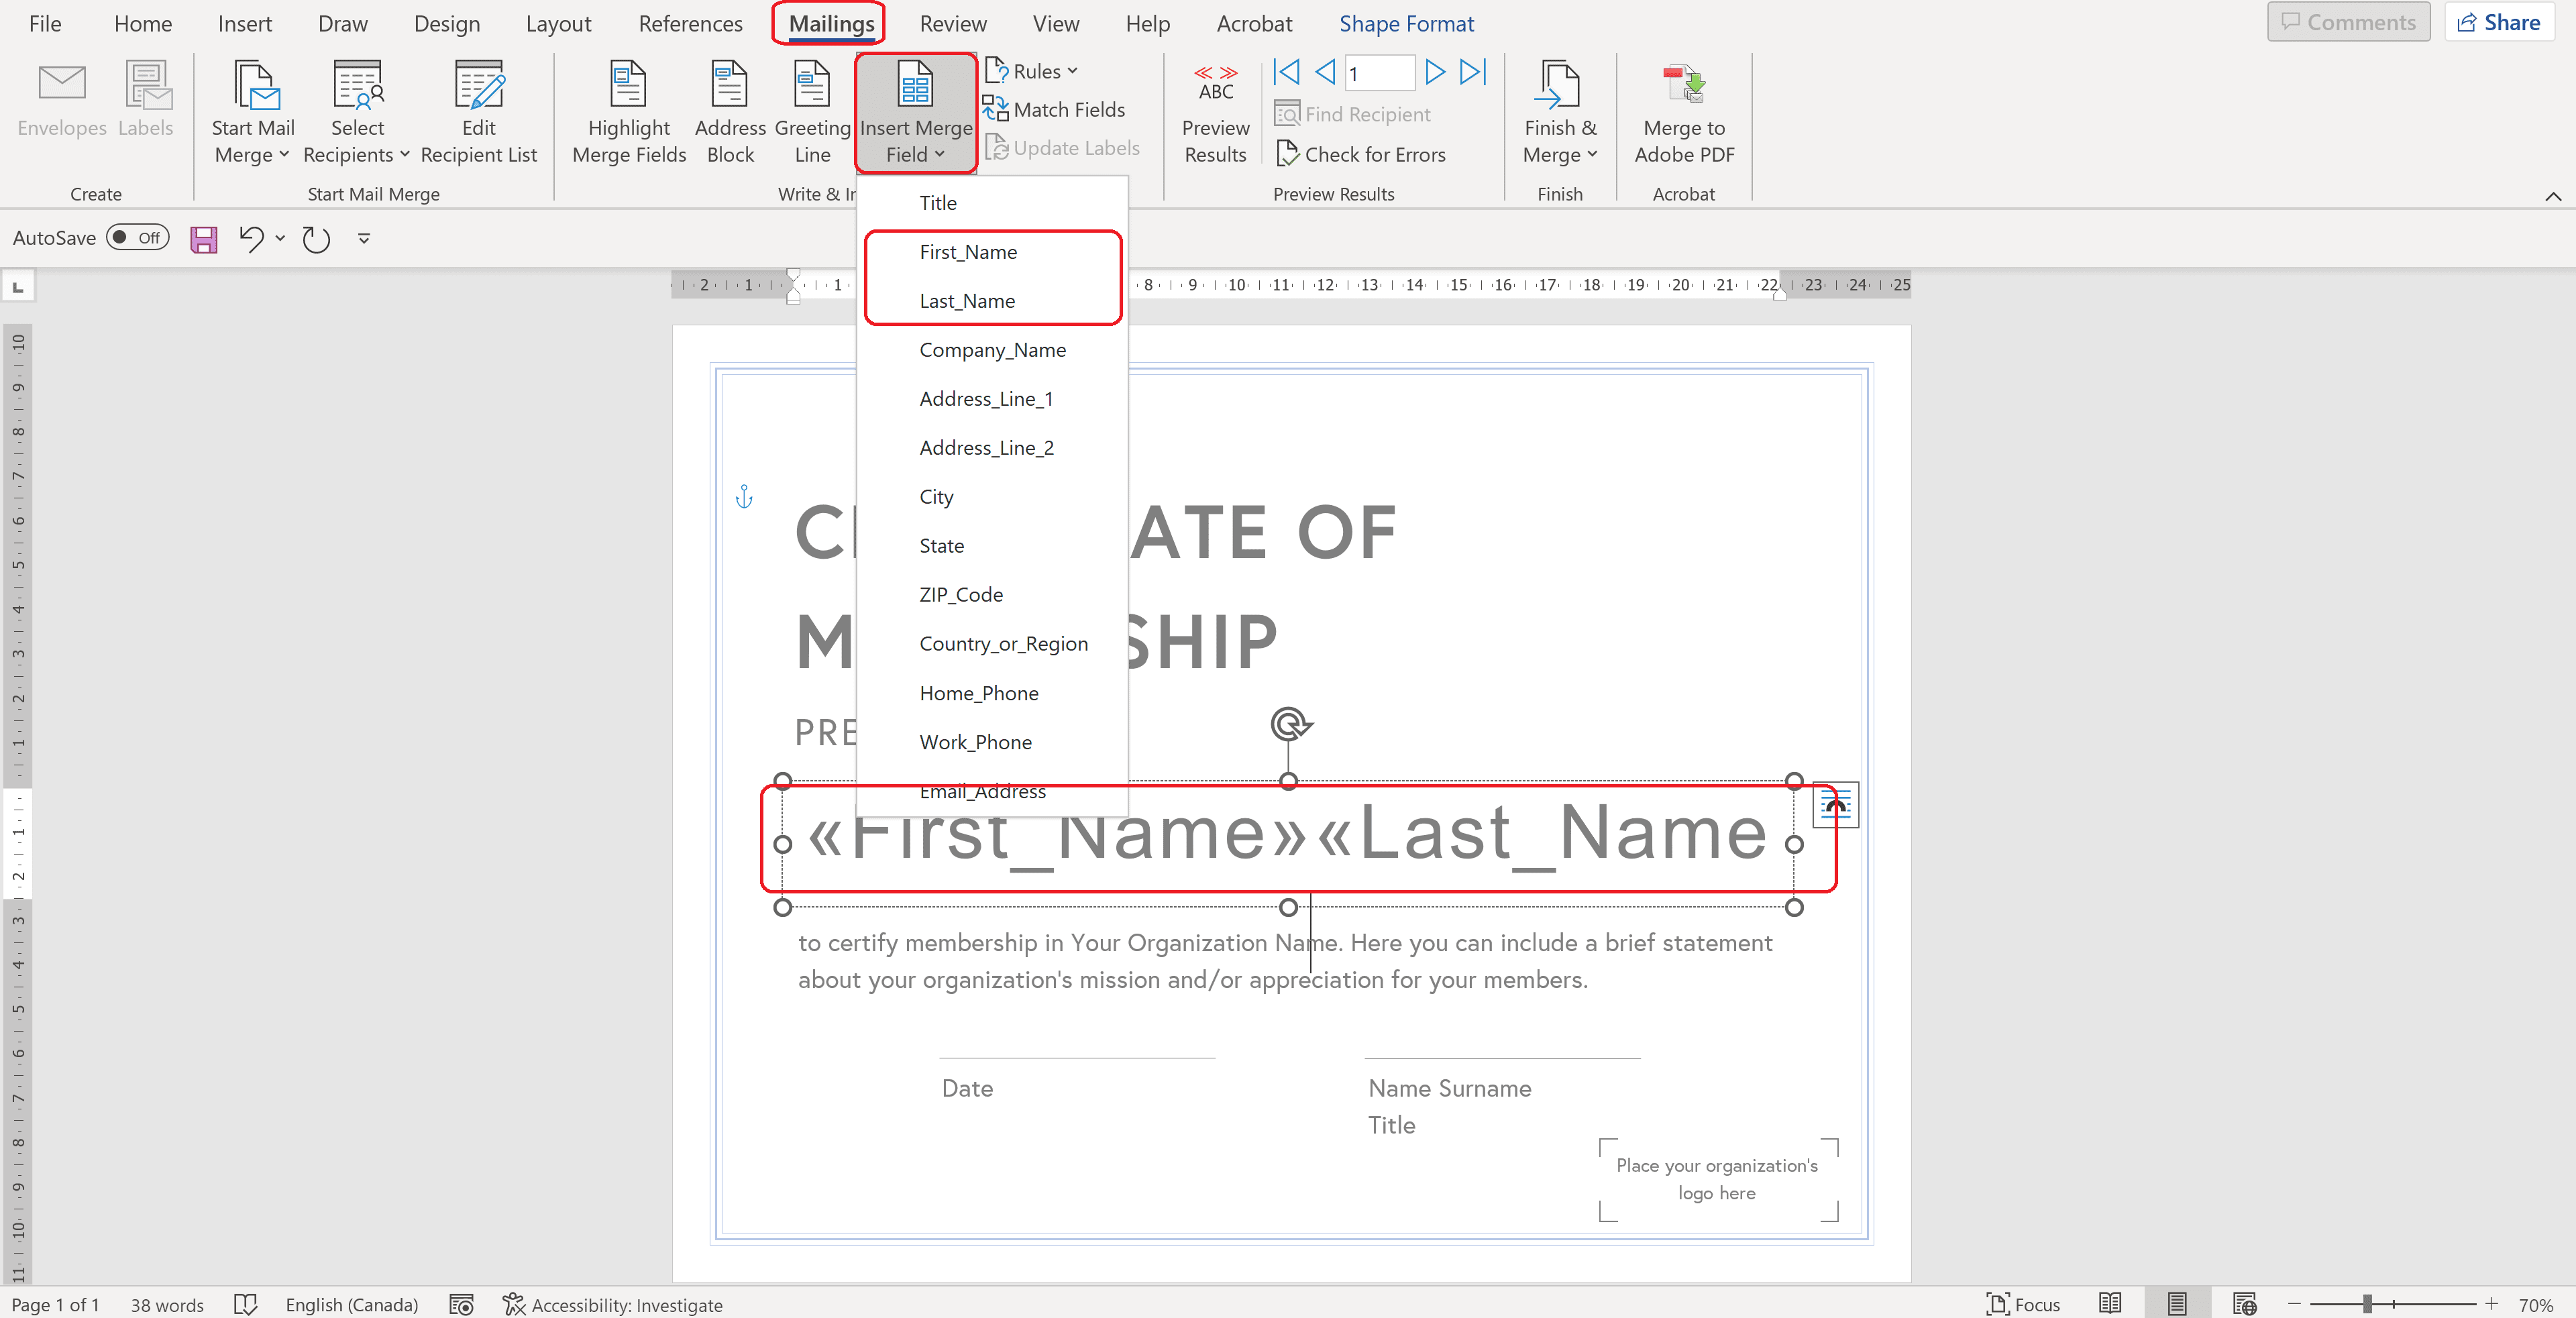
Now you can add mail merge fields where the members’ names would go. In the Mailings tab, click on Insert Merge Field and select the field you’d like to add. Do this for every piece of information that varies from member to member.
Step 7
You can preview your certificates by clicking Preview Results and scrolling through each of the records. When you’re ready to merge them, click on Finish & Merge. Select Edit Individual Documents to create a new Word document with all of the certificates that you can edit further or Print Documents to send them straight to the printer.

Use a Free Template
If you like the convenience of using a ready-made template, but don’t like any of the ones that come with Microsoft Word, we’ve got you covered. You can customize this free template with the recipient’s name and your organization’s logo.
Still looking for more? We have 13 more templates for you to browse. We designed them specifically with membership organizations in mind, so you’ll be sure to find one that fits your needs. Click here to check them out and download them for free.
Whichever option you choose, your members will love receiving certificates and feeling like a valued part of your community!


![The Ultimate Guide to Membership Management Software For Nonprofits [2025 Edition]](https://b2993016.smushcdn.com/2993016/wp-content/uploads/2024/02/Main-Blog-Thumbnails-2025-11-06T180717.949-1024x717.png?lossy=1&strip=1&webp=1)


